Saturday, June 26, 2010

Data Extraction From SAP R/3 to SAP BW

Data Extraction From BA to BW

1. Create Primary Data Source in BA

1.1. Create Primary Data Source in SPRO, Bank Analyzer -> Infrastructure -> Communication and Worklist Services -> Data Source -> Edit Primary data Source


1.2. Select Worklist -> Gen. Prim. DS: Worklist. Right click on “Gen. Prim. DS: Worklist” then click Create.


1.3. Key in the details as per screenshot below:


1.4. Select the required Key Figure and Characteristic for this Primary Data Source.


1.5. After key in all the required fields, “Activate” the Primary data Source.


1.6. Creation of Primary Data Source completed.

2. Create Selection Group and Selection ID

2.1. Create Selection Group and ID in SPRO, Bank Analyzer -> Infrastructure -> Extraction and Reporting Services -> Generic BI Data Extraction -> General Setting For Data Selection -> Selection Setting For Data Extraction -> Edit Basic Setting For Data Source


2.2. Select “New Entries” to create new Selection Group ID. After that create new selection ID.


2.3. Key in the details for selection ID and click save.


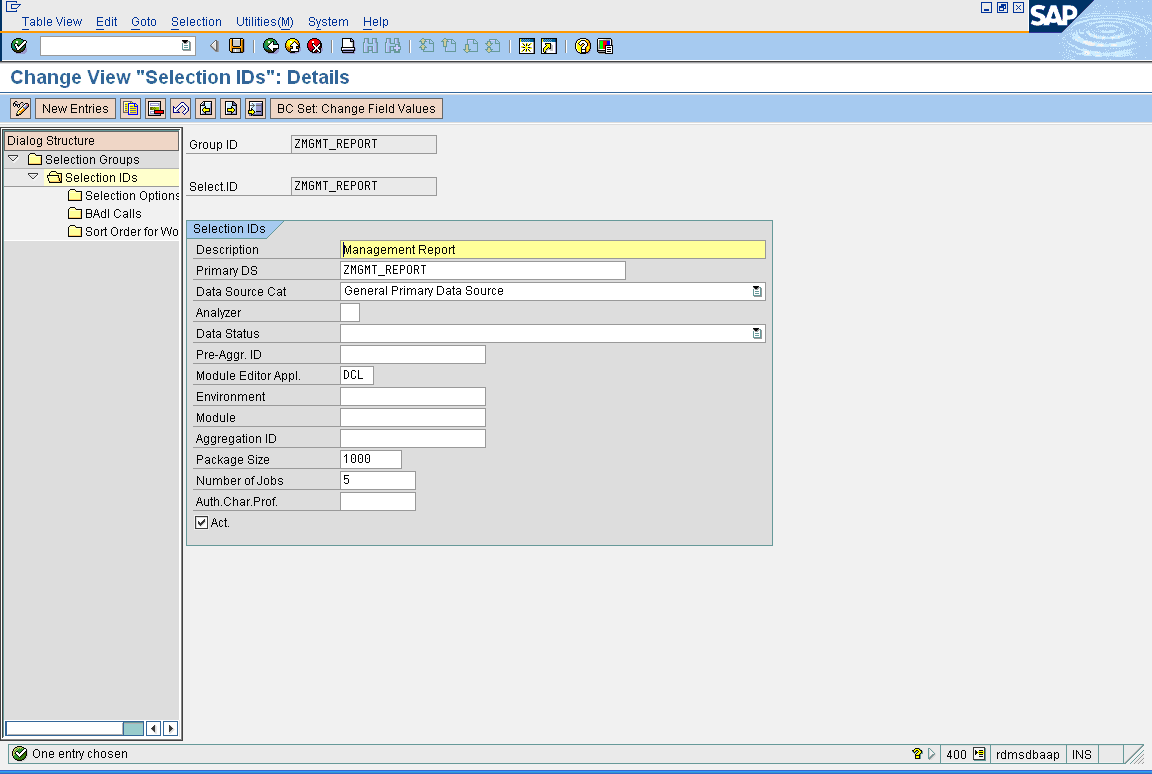
2.4. Creation of Selection Group and Selection ID completed.

3. Create Generic BI Data Extraction

3.1. In SPRO, Bank Analyzer -> Infrastructure -> Extraction and Reporting Services -> Generic BI Data Extraction -> Generic BI Data Extraction


3.2. Click on ‘New Entries’ to create a new Generic BI Data Extraction. Key in the details of the primary data source you created in section 1.


3.3. Click on Data Processing and key in the Group ID and Selection ID you created in section 2. Save the Generic BI Data Extraction.


3.4. Click on ‘Generate Data Source’ to activate the Data Source you created. Then click on save to put it into you transport request.


3.5. Creation of Generic BI Data Extraction completed.

4. Replicate Data Source from BA to BW

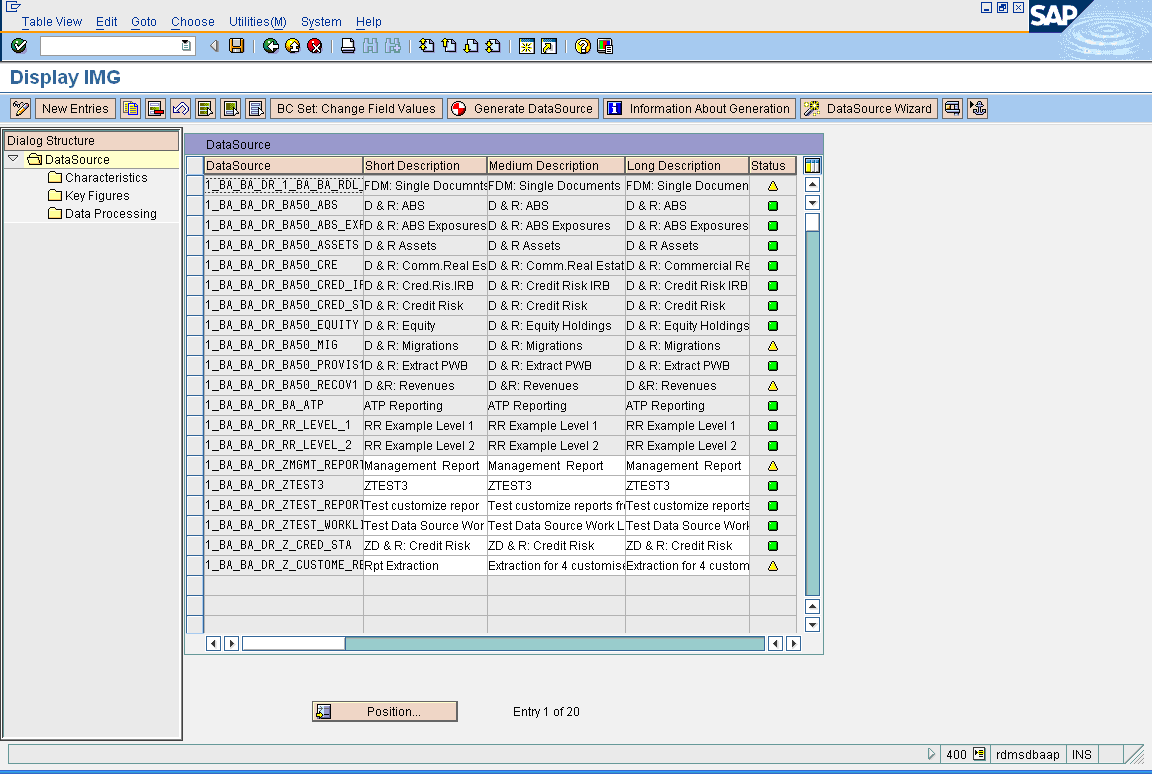
4.1. Log in to BW; go to rsa1 -> Source System -> SAP. Right click on BZD Client 400 and select ‘Replicate DataSources’.

4.2. Choose the Data Source to be replicate as the latest version as we are using BI 7.0. (Do not choose 3.X).


4.3. Go to BZD Client 400 Data Source to verify the Data Source ‘Management Report’ is replicated and activate the Data Source.


4.4. Replicate Data Source from BA to BW completed.

Oracle Table Deadlock Prevention

Oracle Table Deadlock Prevention

The following instructions will show how to change a table parameter so that future deadlocks can be prevented during loading or calculation runs.

1. Log into Oracle Database server as Oracle user.

2. Launch SQLPlus by typing “sqlplus /nolog”.

3. Type “select table_name, owner, ini_trans, max_trans from dba_tables where table_name = ‘/B20C/AR4000’;”. Table name may be substituted by other tables facing deadlock issues.

4. The SQL statement above will show the current parameter value of the table. Default value is less than 10.
5. Change the parameter to the desired value (same number as loading/calculation processes whichever is higher). In our case of having 70 processes for calculation, we choose the value 70. Type “alter table sapsr3.”/B20C/AR4000” initrans 70;”.
6. Confirm by typing “select table_name, owner, ini_trans, max_trans from dba_tables where table_name = ‘/B20C/AR4000’;” again to check the new value.

7. Do the same for all the table’s indexes. See next section.


The following instructions are similar to above but now they apply to the table’s indexes.

1. Log into Oracle Database server as Oracle user.

2. Launch SQLPlus by typing “sqlplus /nolog”.

3. Type “select index_name, owner, ini_trans, max_trans from dba_indexes where table_name = ‘/B20C/AR4000’;”. Table name may be substituted by other tables facing deadlock issues.
4. The SQL statement above will show the current parameter value of the table’s indexes. Default value is less than 10.

5. Change the parameter to the desired value (same number as loading/calculation processes whichever is higher). In our case of having 70 processes for calculation, we choose the value 70. Type “alter index sapsr3.”/B20C/AR4000~0” initrans 70;”.

6. Confirm by typing “select index_name, owner, ini_trans, max_trans from dba_indexes where table_name = ‘/B20C/AR4000’;” again to check the new value.


Sunday, June 6, 2010

Apply SAP Notes & Early Watch Alert

SAP Notes can be applied base on the recommendation given in SAP Notes. Most of the time future Support Pack contain all this SAP Notes fixes. SAP notes can be applied in transaction code “SNOTE”

Apply SAP Notes

  1. Download the SAP note that you want to apply by clicking the “Download SAP Note”
  2. Key in the SAP note number that you want to download
  3. Once download and now it’s ready for upload to the client that you want to apply.
  4. Click on the Implement SAP Note button to import the SAP Note
  5. Then Click continue to implement the SAP Note


Early Watch Alert


Early Watch Alert (EWA) is a proactive service of SAP which can be carried out in the SAP Solution Manager or in the SAP systems.

  1. EWA has been configure to run once in a month.
  2. EWA has been configure in SAP BA and SAP BW production server.
  3. The tcode to check the EWA jobs is in “SDCCN”.
  4. The report will be upload in User's OSS id.
  5. You ask SAP to sent to different OSS id if there is change in future.