Showing posts with label ABAP. Show all posts

Sunday, June 12, 2011

DTP Error : Maximum package size for data packages was exceed

When we trigger DTP (ZDSO_RR -> ZIC_RR) we encounter the error

"DTP Error : Maximum package size for data packages was exceed"
(Please refer to attachement)


You can refer to this note :

Note 1144332 - Consulting note: Message RSBK 250: Package size exceeded

However, it's does not work with my cube loading. The workaround is to unchecked all the fields in the semantic group. The reload back the data. The the load successful!

Generally this issue occurs when the semantic key is set, and as a result package size is not taken into consideration in case there are more records sent with the same semantic keys.

Thursday, June 9, 2011

Steps to upgrade Support Pack Manager

1) Download the latest Support Pack Manager (SPAM) on the SAP service marketplace


2) Transfer the downloaded file to /usr/sap/trans/EPS/in


3) SAP has extract tool to extract the SAR files.You have to login has adm.Then go to the location where you copied SAR files.Then execute “SAPCAR –xvf ”. Copy all the unextracted file to /usr/sap/trans/EPS/in directory.


4) Login as DDIC. Invoke tcode SPAM and load the extracted files. Support PAckage->Load PAckages->From Application Server

5) Then, click Support PAckage->Load PAckages-> Import SPAM/SAINT Update.

6) Then it will automatically update the Support Pack Manager. You're finished!. You may bump into ABAP Dump. Like me, I bump into LOAD_TEXTPOOL_LOST.

However, if you read SAP note 822379

SPAM/SAINT updates

* Symptom: When you import the SPAM/SAINT update, a range of different runtime errors may occur:

o LOAD_PROGRAM_LOST

o LOAD_PROGRAM_CLASS_MISMATCH

o LOAD_TEXTPOOL_LOST

o SAPSQL_SELECT_WA_TOO_SMALL

o SAPSQL_SELECT_TAB_TOO_SMALL

o SAPSQL_WA_TOO_SMALL

o DDIC_STRUCLENG_INCONSISTENT

o RUNT_ILLEGAL_SWITCH

o CALL_FUNCTION_PARM_UNKNOWN

These errors occur because the source code of the Support Package Manager is modified by the import during the run. CALL_FUNCTION_PARM_UNKNOWN, LOAD_PROGRAM_LOST, LOAD_PROGRAM_CLASS_MISMATCH, and LOAD_TEXTPOOL_LOST occur if the ABAP load or text elements are to be loaded back into the local buffer, and there is a different version in the database.
However, SAPSQL_SELECT_WA_TOO_SMALL, SAPSQL_SELECT_TAB_TOO_SMALL, SAPSQL_WA_TOO_SMALL, DDIC_STRUCLENG_INCONSISTENT and RUNT_ILLEGAL_SWITCH occur if changes are made on the SPAM/SAINT data structures with the SPAM/SAINT update.

Solution: None of these errors will occur again if you restart the Support Package Manager (transaction SPAM) and continue to import the SPAM/SAINT update.


Sunday, February 6, 2011

ABAP Dumps we normally face in SAP system

Dear All,

We face several ABAP dumps daily. But do we know what they means?

1) STORAGE_PARAMETERS_WRONG_SET

The problems with STORAGE_PARAMETERS_WRONG_SET are related to the general restrictions of the 32bit OS.You can address only 4GB of virtual memory. Each process in OS is running in its own context and can address max. 4GB.The "heap" parameter: abap/heap_area_dia, abap/heap_area_nondia,abap/ heap_area_total are should be set to 2 GB.

a) Please use in the 'boot.ini' the switch '/3GB' and restart you whole computer as described in the attached OSS notes:

SAP Notes
#552209 - Maximum memory utilization for processes on
#313347 - Windows NT, 2000, 2003: Editions and memory usage.

b)One way to avoid this problem is to try to add more criteria to your report/program/transaction so that there will be less entries that need to be retrieved from your database or buffers. This way, the system would not need to use up much resources to complete the transaction. The query may have been quite big already and the load cannot be accommodated. So please do add more criteria or options so that there will less data to fetch.

c)To decrease the parameter: rdisp/ROLL_SHM, rdisp/PG_SHM

d) Migrate to 64-bit OS (as per SAP Note 931024 (5) and SAP Note 996600)


2) TSV_TNEW_PAGE_ALLOC_FAILED

The error TSV_NEW_PAGE_ALLOC_FAILED means that more memory was request because the program needed to expand an internal table, but not is
available. When Extended Memory is used up, the process will go into PRIV mode as it starts using Heap Memory (or vise-versa). No other user will
be able to use this wp while it is in PRIV mode. If there is enough heap for it to finish, you will not see the error .

SAP Notes
649327 Analysis of memory consumption.
20527 Runtime error TSV_TNEW_PAGE_ALLOC_FAILED
185185 Application: Analysis of memory bottlenecks
369726 TSV_TNEW_PAGE_ALLOC_FAILED


3) TSV_TNEW_OCCURS_NO_ROLL_MEMORY

The dump TSV_TNEW_BLOCKS_NO_ROLL_MEMORY usually means that the roll buffer has been exhausted. Please check the usage of your roll buffer with ST02->history->page near the bottom to see ROLL BUFFER history. If the roll buffer has been exhausted, you can increase the size with
parameter rdisp/ROLL_MAXFS, but make sure you have sufficient disk space to handle the additional size of this buffer if it writes to disk.

SAP Notes
185185 Application: Analysis of memory bottlenecks


4) LOAD_PROGRAM_LOST

The LOAD_PROGRAM_LOST error can occur when there are two or more versions of a given program loaded into the buffer at any given time. This happens when the program is changed by one user while it is still in use by another user. When a user gets to the program that is having this problem and R/3 attempts to load the generated version from the buffer, it sees that the version is not the most current and tries to swap it out for the most
current, but the load was lost from the pxa buffer, hence the dump of LOAD_PROGRAM_LOST.

LOAD_PROGRAM_LOST are the result of the combination not enough PXA space + changes of programs which are in use currently. A running program can't run with two different versions of one program). Ask the users restart their transactions (/nva01). By the way, if the PXA would be big enough then the user which do not leave their transaction (e.g. va01) for weeks will not see the changes to this application until they restart the transaction.

Other way to correct the error is you need to run trancode SAMT & regenerate the program(s) that are listed in the dump. You can then do a $SYNC in the OK code field in the affected application server, but the other application servers should not be running. After the $SYNC, the other app servers can be brought up and the buffers should then be in sync.

SAP Notes
5451 LOAD_PROGRAM_LOST
24824 Inconsistencies in a Program Load
10367 Termination LOAD_PROGRAM_LOST


5) CALL_FUNCTION_SIGNON_INCOMPL

The short dump CALL_FUNCTION_SIGNON_INCOMPL is typical of an RFC-Call with incorrect or missing logon-data. So, we have to find out where the call is coming from.

SAP Notes
171805 Determining RFC client when sign-on problems occur.
684788 Possible reason for CALL_FUNCTION_SIGNON_INCOMPL.
901256 Rabax "CALL_FUNCTION_SIGNO N_INCOMPL".


6) RFC_NO_AUTHORITY

This error mostly appears with SAPSYS user.SAPSYS is an internal user, it is not a personally used ID in the R/3 system. However, all system errors and abap programs are run via this user id, without SAPSYS your system will crash. As per note 93254 ,since release 4.0 the parameter auth/rfc_authority_check is set on 1 per default. This means, as long as you did NOT set it explicitly to value '0' any incoming RFC call is checked as described in the mentioned note.
Solution:

1- deactivate RFC authority check :set auth/rfc_authority_check to value '0' (zero) in your profile and restart the server.
This is the least secure option as any authorization checks are disabled for all RFC requests.

2- Assign full RFC authorities to the users who need to connect to your system via RFC.
Please also check the user id provided in RFC connection (check from SM59) which cause the dump RFC_NO_AUTHORITY. Make sure that this user has sufficient authorizations .

SAP Notes
171805 Determining RFC client when sign-on problems
93254 RFC short dump RFC_NO_AUTHORITY
91980 Missing output of RFC short dump after login errors


7) SYSTEM_NO_TASK_STORAGE

For the error, please go to service market to download the latest patch for your SAP Appl release and apply the patch. The latest patch would be useful for the problem. The SYSTEM_NO_TASK_STORAGE is known problem and related to limitation of 32bit OS. Please see notes 110172, 552209, 546361 for details. As long term solution you have to use 64bit Windows (note 996600).The cause for the effect system_no_task_storage could also be a old
collector, this collector should not much more used. Use now, the new collector (described in note 868063).

Please check the following

1. Check your settings match the recommendations note 146289.
2. Are ulimits set according to note #323816 referenced in note #146289?
3. With alot e.g. 8GB of RAM and if there is no additional instances on same host then it should be possible to increase EM/TOTAL_SIZE_MB from 4096 towards the RAM and even higher so that ztta/roll_extension can be reached, the swap space should be set according to note #153641 for this.
SAP Note 146289 - Parameter Recommendations for 64-Bit SAP Kernel also ensure that your ulimits are set as per SAP Note 323816 User limits on AIX referenced in SAP Note 146289

Also please adhere to the guidelines as per SAP note 789477 Large extended memory on AIX (64-bit) as of Kernel

146289 Parameter Recommendations for 64-Bit SAP Kernel
191801 AIX 64-bit with a lot of Extended Memory
445533 Lots of extended memory on AIX (64-bit)
581319 Signal 33 on AIX (64-bit only)
153641 Swap space requirement for R/3 64-bit kernel


8) CALL_FUNCTION_NOT_FOUND

The error CALL_FUNCTION_NOT_FOUND is due to the fact that the program called the function which doesn't exist in the library , means if the requested
function module is not found in table TFDIR.

Error causes:

(1) The function module does not exist (SE16 table=TFDIR)
(2) The buffered version of the TFDIR contains errors.

98458 SAPMSSY1, CALL_FUNCTION_NOT_FOUND


9) CALL_FUNCTION_SINGLE_LOGIN_REJ

SAP Notes
128447 Trusted/Trusting Systems
204039 Authorization check in trusted system


10) SYSTEM_CORE_DUMPED

Generally, SYSTEM_CORE_DUMPED is related to R/3 system kernel. Upgrade the kernel patch to the latest.

SAP Notes
19466 Downloading SAP kernel patches

Friday, February 4, 2011

SAP BW Modeling Tutorial - Part 6

1) Maintain Master Data DP


2) Maintain Master Data PR


3) Create Hierarchy PR


4) Activate Hierarchies


5) SAP BEx Query Designer

SAP BW Modeling Tutorial - Part 5

1) Create Update Rules


2) Create InfoPackage CU


3) Create InfoPackage DP


4) Create InfoPackage PR


5) Create InfoPackage TRANSDATA


SAP BW Modeling Tutorial - Part 4

1) Assign Data Source CU


2) Assign Data Source DP


3) Assign Data Source PR


4) Assign Data Source TRANSDATA


SAP BW Modeling Tutorial - Part 3

1) Create Source System


2) Create Application Component


3) Create InfoSource CU


4) Create InfoSource DP


5) Create InfoSource PR


6) Create InfoSource TRANSDATA

SAP BW Modeling Tutorial - Part 2

1) Create Infocube Gesamt


2) Create InfoCube Step 1


3) Create InfoCube Step 2 Characteristics


4) Create InfoCube Step 3 Time Characteristics


5) Create InfoCube Step 4 Key Figures


6) Create InfoCube Step 5 Activate

SAP BW Modeling Tutorial - Part 1

1) Creating an infoarea


2)
Create Info Object Catalong (Characteristics)


3) Create Characteristics PR


4) Create Characteristics CU


5) Create Characteristics DP


6) Create Key Figures TRA


7) Create Key Figures QTY


8) Create Key Figures REV


8) Create Key Figures USP


Tuesday, February 1, 2011

Troubleshooting : Housekeeping on /sapmnt/SID/global full

Housekeeping on /sapmnt/SID/global full

While I was performing my daily monitoring tasks, I found that many Jobs had got cancelled, and when I tried to read the job log to find out what was the error I couldn’t read any of the logs. I received an error “Error reading Job log”.

When I checked the System log (SM21), the logs read

“Failed to create log for job 04534901%_EVENT

Error synchronizing file /usr/sap//SYS/global/100JOBLG/0001X045349”

When I checked the /sapmnt//global directory, I found that 100% full. This was the reason why the jobs were failing; the job was not able to create its job log.

Due to this file system full, many SAP processes also got canceled and lots of tickets were getting raised. Just then realized how important it is monitor file system when we perform our daily checks.

Now let me tell how housekeeping can be done on this file system /sapmnt//global. The global directory contains the job logs. Old job logs can be deleted by running report RSBTCDEL2 in se38. Choose the number of days old logs that can be deleted. We must make sure that the standard SAP job SAP_REORG_JOBS is run, so that old job logs get deleted automatically.

The global directory also contains some files of format WF_LOGS*. These are work flow trace files. The note 113656 gives us information about these logs. You can use transaction SWU10 or SWT0 transactions to delete the old work flow trace files.

In general, you can schedule a job that will delete the logs or just use transaction SWU10 -> ‘Delete obsolete workflow trace files’. To schedule, just go to the menu: Program => Execute in background and schedule from there. The report that it is running is RSWTTR02, so if you have any problems with SWU10, you can always schedule the job manually via SM36.

Thursday, January 13, 2011

Useful Ebooks for Download

SAP Basis Ebooks

Weekly Basis Training

BASIS Week 1
http://www.ziddu.com/download/13375094/BASIS_Week1.pdf.html

BASIS Week 2
http://www.ziddu.com/download/13375205/BASIS_Week2.pdf.html

BASIS Week 3
http://www.ziddu.com/download/13378275/BASIS_Week3.pdf.html

SAP BASIS installation on UNIX with Oracle Database
http://www.ziddu.com/download/13376085/SAP_Basis_Installation_on_UNIX_-_Oracle_Database.pdf.html

SAP Standards for System Administration
http://www.ziddu.com/download/13375845/SAPStandardforSystemAdministration.pdf.html

SAP Database Guide
http://www.ziddu.com/download/13375723/SAPDatabaseGuide-Oracle.pdf.html

SAP Standard Jobs
http://www.ziddu.com/download/13376060/SAPStandardJobs.pdf.html

Installing SAPOSCOL
http://www.ziddu.com/download/13375673/InstallingSAPOSCOL.pdf.html

Introduction to SAP FI
http://www.ziddu.com/download/13375677/Introduction_to_SAP_FI.pdf.html

Fine Tuning Performance for SAP Enterprise Portal
http://www.ziddu.com/download/13375666/FinetuningperformanceSAPEnterprise_Portal.pdf.html

BASIS Operations for UNIX Linux
http://www.ziddu.com/download/13374843/BasisOperationsUNIXLinux.pdf.html

ABAP Performance Tuning
http://www.ziddu.com/download/13375301/BC490ABAPPerformanceTuning.pdf.html

Scot Configuration Troubleshooting
http://www.ziddu.com/download/13374776/12753028-Scot-Configuration-Troubleshooting.pdf.html

SAP Bank Analyzer
http://www.ziddu.com/download/13374709/SAPBankAnalyzer.pdf.html


SAP BW (Business Warehouse) Ebook

SAP BW Modeling Step by Step
http://www.ziddu.com/download/13379046/SAPBWModellingStepbyStep.pdf.html

I learn SAP BW from this Books, Fu-Fu SAP BW : Step by Step
http://www.ziddu.com/download/13379047/SAP-BWStepByStepFrom-Fu-Fu.pdf.html

Sunday, July 4, 2010

New Client Creation

1. Create a new client

1.1 Use transaction SCC4

1.2 Click on ‘Display-change’ box and click continue

1.3 Click on ‘new entry’ and key-in details for new client

i. Client: 300/ETL
ii. Client role: Production
iii. City: KL
iv. Currency: MYR
v. Changes and transports for client-specific object: No changes allowed
vi. Client Independent object changes: No changes to Repository and cross-client Customizing objs
vii. Protection: Client copier and comparison tool: No overwriting

1.4 Click on Save

1.5 Define Logical System – SALE transaction > Basic Setting > Define Logical Setting e.g BZDCLNT300 – BZD ETL Client

1.6 Click Save

2. Start the Client Copy

2.1 Logon to ETLBZD Client 300 as (administrator id) e.g MBBALWEN

2.2 Verify Client setting SCC4 (should be the same with item 1.3(v.), 1.3(vi), 1.3(vii))

2.3 Key in transaction SCCL, and select Profile: SAP_ALL

Source Client: 200
Source Client User Master: 200

2.4 Click on ‘Schedule as background job’

2.5 On ‘Background server’ accept the server name

2.6 At ‘Verification’ screen Click at Continue

2.7 Click at immediate

2.8 Click at Save and then printer, key in LP01

2.9 Click at ok

2.10 And finally, Click ok and the client copy job will run
(This process will take about 2 hours to complete.)

2.11 Use transaction SM50 and SM37 to check the status of the job.

2.12 Once done, check the log using transaction SCC3, SM50 and SM21.


Saturday, June 26, 2010

Data Extraction From SAP R/3 to SAP BW

Data Extraction From BA to BW

1. Create Primary Data Source in BA

1.1. Create Primary Data Source in SPRO, Bank Analyzer -> Infrastructure -> Communication and Worklist Services -> Data Source -> Edit Primary data Source


1.2. Select Worklist -> Gen. Prim. DS: Worklist. Right click on “Gen. Prim. DS: Worklist” then click Create.


1.3. Key in the details as per screenshot below:


1.4. Select the required Key Figure and Characteristic for this Primary Data Source.


1.5. After key in all the required fields, “Activate” the Primary data Source.


1.6. Creation of Primary Data Source completed.

2. Create Selection Group and Selection ID

2.1. Create Selection Group and ID in SPRO, Bank Analyzer -> Infrastructure -> Extraction and Reporting Services -> Generic BI Data Extraction -> General Setting For Data Selection -> Selection Setting For Data Extraction -> Edit Basic Setting For Data Source


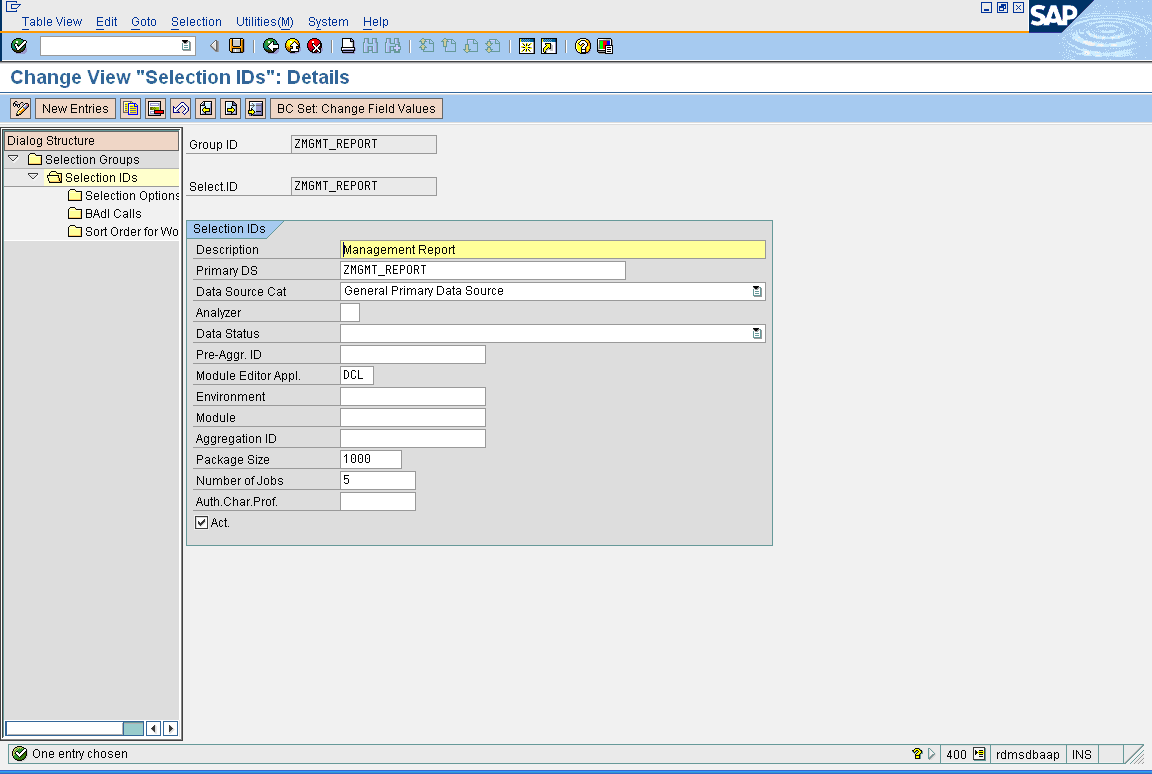
2.2. Select “New Entries” to create new Selection Group ID. After that create new selection ID.


2.3. Key in the details for selection ID and click save.


2.4. Creation of Selection Group and Selection ID completed.

3. Create Generic BI Data Extraction

3.1. In SPRO, Bank Analyzer -> Infrastructure -> Extraction and Reporting Services -> Generic BI Data Extraction -> Generic BI Data Extraction


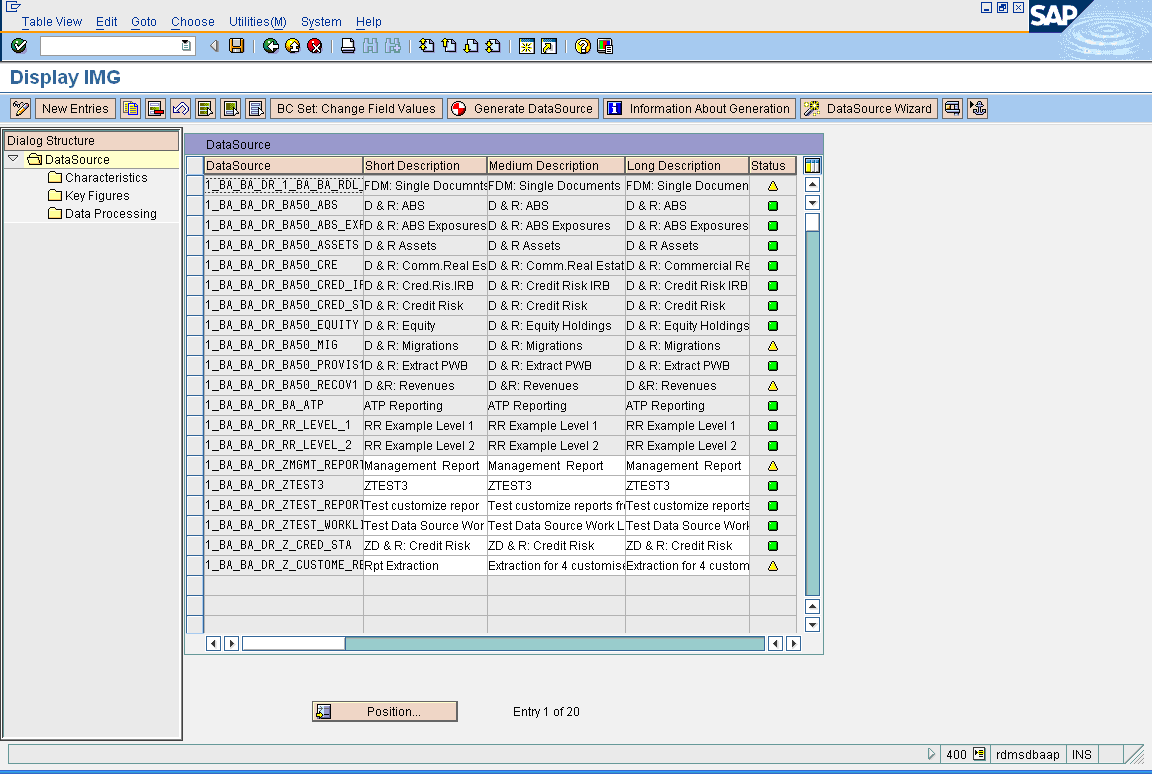
3.2. Click on ‘New Entries’ to create a new Generic BI Data Extraction. Key in the details of the primary data source you created in section 1.


3.3. Click on Data Processing and key in the Group ID and Selection ID you created in section 2. Save the Generic BI Data Extraction.


3.4. Click on ‘Generate Data Source’ to activate the Data Source you created. Then click on save to put it into you transport request.


3.5. Creation of Generic BI Data Extraction completed.

4. Replicate Data Source from BA to BW

4.1. Log in to BW; go to rsa1 -> Source System -> SAP. Right click on BZD Client 400 and select ‘Replicate DataSources’.

4.2. Choose the Data Source to be replicate as the latest version as we are using BI 7.0. (Do not choose 3.X).


4.3. Go to BZD Client 400 Data Source to verify the Data Source ‘Management Report’ is replicated and activate the Data Source.


4.4. Replicate Data Source from BA to BW completed.

Oracle Table Deadlock Prevention

Oracle Table Deadlock Prevention

The following instructions will show how to change a table parameter so that future deadlocks can be prevented during loading or calculation runs.

1. Log into Oracle Database server as Oracle user.

2. Launch SQLPlus by typing “sqlplus /nolog”.

3. Type “select table_name, owner, ini_trans, max_trans from dba_tables where table_name = ‘/B20C/AR4000’;”. Table name may be substituted by other tables facing deadlock issues.

4. The SQL statement above will show the current parameter value of the table. Default value is less than 10.
5. Change the parameter to the desired value (same number as loading/calculation processes whichever is higher). In our case of having 70 processes for calculation, we choose the value 70. Type “alter table sapsr3.”/B20C/AR4000” initrans 70;”.
6. Confirm by typing “select table_name, owner, ini_trans, max_trans from dba_tables where table_name = ‘/B20C/AR4000’;” again to check the new value.

7. Do the same for all the table’s indexes. See next section.


The following instructions are similar to above but now they apply to the table’s indexes.

1. Log into Oracle Database server as Oracle user.

2. Launch SQLPlus by typing “sqlplus /nolog”.

3. Type “select index_name, owner, ini_trans, max_trans from dba_indexes where table_name = ‘/B20C/AR4000’;”. Table name may be substituted by other tables facing deadlock issues.
4. The SQL statement above will show the current parameter value of the table’s indexes. Default value is less than 10.

5. Change the parameter to the desired value (same number as loading/calculation processes whichever is higher). In our case of having 70 processes for calculation, we choose the value 70. Type “alter index sapsr3.”/B20C/AR4000~0” initrans 70;”.

6. Confirm by typing “select index_name, owner, ini_trans, max_trans from dba_indexes where table_name = ‘/B20C/AR4000’;” again to check the new value.


Sunday, June 6, 2010

Apply SAP Notes & Early Watch Alert

SAP Notes can be applied base on the recommendation given in SAP Notes. Most of the time future Support Pack contain all this SAP Notes fixes. SAP notes can be applied in transaction code “SNOTE”

Apply SAP Notes

  1. Download the SAP note that you want to apply by clicking the “Download SAP Note”
  2. Key in the SAP note number that you want to download
  3. Once download and now it’s ready for upload to the client that you want to apply.
  4. Click on the Implement SAP Note button to import the SAP Note
  5. Then Click continue to implement the SAP Note


Early Watch Alert


Early Watch Alert (EWA) is a proactive service of SAP which can be carried out in the SAP Solution Manager or in the SAP systems.

  1. EWA has been configure to run once in a month.
  2. EWA has been configure in SAP BA and SAP BW production server.
  3. The tcode to check the EWA jobs is in “SDCCN”.
  4. The report will be upload in User's OSS id.
  5. You ask SAP to sent to different OSS id if there is change in future.


Saturday, May 29, 2010

Patch Management - Kernel Upgrade

Kernel Upgrade

SAP Kernel contain all executables program. If you upgrade ABAP or Java Support Pack you need to upgrade SAP Kernel too depending on the patch level too. Kernel upgrade is easy and fastest to do.


Steps to check current Kernel level

  1. Login to SAP and go to SM51
  2. Click on Release Notes button
  3. SAP Kernel: show your Kernel version
  4. Kernel Patch number show the current kernel patch number


Steps to upgrade Kernel

  1. Download the latest SAP Kernel from Market Place.
  2. Shutdown SAP application and Database
  3. Kernel location is /sapmnt//exe
  4. Make backup of “exe” directory which is compulsory steps
  5. Untar the kernel files that you download from Market Place
  6. Copy all files which you untar to /sapmnt//exe


Patch Management - ABAP Support Package Upgrade

ABAP Support Package Upgrade

SAP BA and SAP BW main engine is running under ABAP. Only SAP BW has J2EE engine which is for SAP Enterprise Portal. Java Support pack upgrade covers in next section. You only can apply SP in client “000” and recommended user to use by SAP is “DDIC”. Transaction code SPAM are use to apply ABAP SP and check the current SP level

Check current ABAP SP Level

This show the current SP Manager level. Always apply the latest SP Manager support pack before you apply SP.
Package Level button to display the current package level
The pop up will show current level of all components


Import Prerequisite

For QAS and PRD server as my company policy there is 15 min timeout setting is in place if the session is idle. Before you start to apply ABAP SP you need to turn off the time out. Fail to do this, ABAP SP will fail or teminate after 15 min.
You need to change the parameter in RZ10 and parameter name is rdisp/gui_auto_logout – Set the value to “0”.

There are 3 steps for apply Support Pack which is:
  • Steps 1: Download the SP from Market Place (this is covers in previous post)
  • Steps 2: Load Packages into SAP
  • Steps 3: Create Queue and apply SP
Steps 2: Load Packages into SAP

  1. From tcode SPAM select menu Support Package -> Load Packages -> From Application Server
  2. Then Select Yes to continue to load packages
  3. If it’s new package it show as “Uploaded successfully”
  4. If it’s package that has been uploaded it show already exists
  5. To display all upload packages, from SPAM screen click on the “Display” button.

Steps 3: Create Queue and apply SP

  1. From tcode SPAM screen click on the Display button.
  2. Select the Packages that you want to upgrade
  3. Then Click on the Queue button
  4. Then Click continue to create queue
  5. Once you are back to main screen click on the lori button to start import then selected queue.
  6. Then just click on continue button to continue the process. The duration of import run’s depending on the package size.


Patch Management - What to Download

Download Support Package

All SAP Support Package are required to download from Market place http://service.sap.com/swdc.

  1. Login to Market Place at http://service.sap.com/swdc with you OSS-id
  2. Expand Download
  3. Click on My Company’s Application
  4. SAP NETWEAVER link to download ABAP and Java SP and Kernel files. Java SP is only applicable for SAP BW Server. ABAP SP and Kernel is applicable for SAP BA and SAP BW server.
  5. SAP SPAM/SAINT Update link to download the latest version of Support Package Manager
  6. You also can download Kernel from this main page.
  7. In next Section you will see steps to download for ABAP SP, Java SP and Kernel

Download Kernel

  1. Follow the Link show in the screen shot which is My Company’s Application Components -> SAP NETWEAVER-> SAP NETWEAVER 7.0-> Entry by Components->Application Server ABAP
  2. Expand the Kernel SAP KERNEL 7.0 64-BIT UNICODE ->AIX 64bit
  3. You have to download Kernel Part 1 from ORACLE link and Kernel PART 2 from #Database independent link
  4. You need to download 1 SAR file from Kernel Part 1 which is latest and normally the name start with “SAPEXE_XXXX”
  5. Then you need to down 2 files from Kernel Part 2. Which is DBA tools and Kernel Part 2 (latest patch)
  6. SAPCAR all the 3 files in 1 temporary directory.

Download ABAP Support Package


  1. Follow the Link show in the screen shot which is My Company’s Application Components -> SAP NETWEAVER-> SAP NETWEAVER 7.0-> Entry by Components->Application Server ABAP
  2. Select the component that you want to download e.g. SAP BASIS 7.00
  3. Then Select the package level that you want to download
  4. Then click on to “Add to Download Basket” to download.
  5. The info button give information about the each packages
  6. Then SAPCAR all download package to /usr/sap/trans/EPS/in in development application server
  7. Two files should be created when you SAPCAR each ABAP SP files which is .ATT and .PAT

Download JAVA Support Package

  1. Follow the Link show in the screen shot which is My Company’s Application Components -> SAP NETWEAVER-> SAP NETWEAVER 7.0-> Entry by Components->Application Server Java
  2. Select the package from the list
  3. Then Select the package level that you want to download
  4. Then click on to “Add to Download Basket” to download.
  5. The info button give information about the each packages
  6. Then copy all download package to /usr/sap/trans/EPS/in in SAP BW development application server.
  7. The file name should be with extension .SCA

Extract SAR files

  1. All SAR files that has been download and copied to server need to be extract.
  2. SAP has extract tool to extract the SAR files.
  3. You have to login has adm
  4. Then go to the location where you copied SAR files
  5. Then execute “SAPCAR –xvf
  6. Copy all the .ATT and PAT file to /usr/sap/trans/EPS/in directory.
  7. Then use SPAM to upload this files to SAP